Text Inspector
When you have a text layer selected you will notice that the Inspector has changed to show you all the properties that apply to text.
Underneath the standard layer properties there’s the area for Shared Text Styles.
Below that, you can choose and apply the various text properties that you would expect. Such as the typeface (font-family), weight (e.g. light, bold, italic), and the font size. In addition, you can also adjust the text alignment, determine whether the layer should be at a fixed, or automatic width, and adjust character, line, and paragraph spacings.
Text Color
When you’re editing text, you can apply specific colors to a subrange of the the text. You can do so using the Color button between the font size and the Options button.
You can also apply a general Fill style to the text layer, such as a gradient. However, any fill applied here will apply to the entire text layer and it will override anything you set in the color box above it.
Text Options
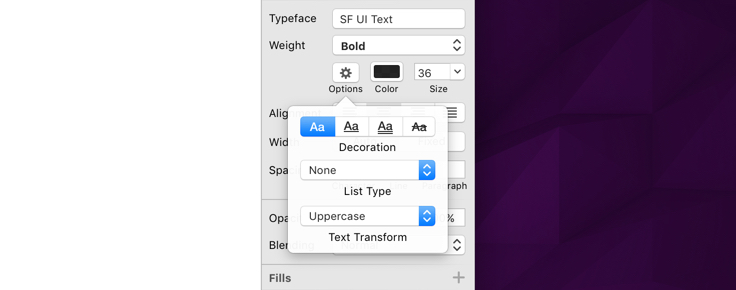
By clicking the Options button ![]() , you will reveal a popover allowing you to apply text decorations such as underline and strikethrough, options to allow you to convert a text layer with many lines to a list, and options to transform the text selection.
, you will reveal a popover allowing you to apply text decorations such as underline and strikethrough, options to allow you to convert a text layer with many lines to a list, and options to transform the text selection.
In the text transform pop-up menu you can choose to adjust how your text looks in a way that is completely non-destructive. This means you can style your text so its uppercase, or lowercase without having to re-type it.
Alignment
In Sketch, you can align text horizontally as well as vertically. In order to see the changes to a text layer’s alignment, you can set the text box to either Auto or Fixed.
When the alignment is set to Auto, the text box’s width will expand as wide as possible to fit the text you entered, and the horizontal alignment is taken into account when you type.
When the alignment is set to Fixed, you can click and drag the handles that appear on the Canvas to adjust the height and width of your text layer. When entering text, it’ll wrap and a new line will be created when a word can’t fit in the remaining width.
As well as being able to adjust the horizontal alignment, text can be aligned vertically to the top, middle, or bottom when you have given the text layer a Fixed height.

Line Height
Sketch maintains consistent baseline spacing for paragraphs anytime you adjust the line height. If you change the typeface or font size for a text layer, the layer repositions itself so the first baseline will always stay in place.
The consistent baseline offset is also maintained between paragraphs, even with varying fonts, as long as they have a fixed line height. This produces a beautiful predictable vertical rhythm. When no fixed line height is set, we use the one indicated by the font itself.
When you create a new text layer, it will use the “auto” line height rather than inheriting what was previously set. Text layer auto line height is distinct from a fixed line height of the same value, and the Inspector displays the auto value as a placeholder.
Touch Bar
When a text layer is selected, some basic properties are available on the MacBook Pro’s Touch Bar. Here you have options to access the properties pane in the Inspector, as well as options to adjust the text color, alignment, and layer order.

