Make Exportable
To mark any layer, group, or Artboard as an exportable layer in Sketch, make sure it is selected, and click the “Make Exportable” button at the bottom of the Inspector.

When a layer has been marked as ‘exportable’, a new view will appear in the place of the button. It‘s here where you can adjust and define the settings for export. Anything here will be applied when the layer is exported.
Clicking on the add button ![]() in the “Export” title will add another scale to your export. The default values will be automatically determined by the previous settings, but this means Sketch will export a different version of the image, as defined.
in the “Export” title will add another scale to your export. The default values will be automatically determined by the previous settings, but this means Sketch will export a different version of the image, as defined.
The presets button ![]() will allow you to switch between multiple pre-defined presets with ease. In the pop-up menu that appears, options to create, and edit existing presets can be found here too. To learn more about export presets, please check out the Export Presets chapter.
will allow you to switch between multiple pre-defined presets with ease. In the pop-up menu that appears, options to create, and edit existing presets can be found here too. To learn more about export presets, please check out the Export Presets chapter.
Export Settings
The export settings apply to any layer or slice, and it enables you to export to multiple sizes, or filetypes, without the need of individually defining them in the Canvas. Here, you will see three main controls. Size, prefix/suffix, and format.
Size
You can define the size, or scale in which an element will export, either by entering a value, or selecting one already defined in the pop-up menu.
The default size is ‘1x’, which will export your layer at the actual size it was created. If you’re designing for mobile, you may want to export something at double the size you created it, in this case ‘2x’. There’s no limit to how much you can multiply by, and you can even scale down in the case of ‘0.5x’. If designing for Android devices specifically, then you can export to a custom size.
Aside from just multiplying the scale, you can also export to a particular width, or height. For example, to export a layer from its original size to 128 pixels wide, simply type ‘128w’. ‘128h’ would be used to export to 128 px tall.
To learn everything there is to know about pixel densities, check out Pixel Density, Demystified from Peter Nowell.
Prefix/Suffix
This text field works in conjunction with the size control. If you have more than one export scale defined, then at least one prefix or suffix is required to append onto the start or end respectively, of the exported file’s name to tell them apart.
You can choose between whether an export scale should have a prefix, or suffix applied by clicking the indicator in the text field and choosing your option via the pop-up menu. The ellipses (…) in the field is a representation of your layer’s name. Anything that appears before that, is a prefix, whilst a suffix appears on the end, before the filetype.
Typically, objects exported at a ‘2x’ scale will have the suffix of “@2x” as this meets the naming conventions required by Apple when designing for their operating systems. If you’re designing for Android however, ‘2x’ is represented by the “xhdpi/” prefix.
Format
The format button allows you to choose which file format you would like to export to via the pop-up menu. File formats are covered in greater detail in their own section.
Exportable Layers or Slices?
Exporting a layer by itself means that no other elements on the Canvas will be exported with it, and its size will be defined by the layer’s bounds. If there’s a layer on top or a background below it, neither of those will be included in the export.
Marking layers as exportable has its uses, but it doesn’t cover all cases. This is where slices can come into effect.
It’s possible to create a slice straight from an exportable layer. Simply click the Slice button ![]() in the “Export” title and a new slice layer will be created around the object containing the defined settings.
in the “Export” title and a new slice layer will be created around the object containing the defined settings.
No matter whether a layer is a slice or marked as exportable, it can be quickly exported via the Command-E shortcut.
Layer List
Layers that have been made exportable will make themselves known in the Layer List, by displaying a small slice icon ![]() next to the layer preview.
next to the layer preview.

However, you can directly export any layer, straight from the Layer List without having to make it exportable or defining slices. If you click-and-drag any layer from the Layer List out of the application, Sketch will quickly export it as a PNG. If you hold down the Option key, it’ll export as a PDF instead.
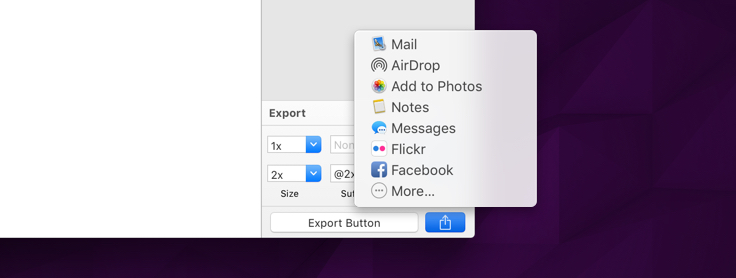
Sharing
When you want to export your object, you can click the “Export…” button to quickly save it to a location on your computer, or click the Share button ![]() to attach to an email, share in a tweet, AirDrop it to a colleague, etc.
to attach to an email, share in a tweet, AirDrop it to a colleague, etc.