Borders
All layers except text layers can contain as many borders as you want. These can all have various thicknesses, colors, and blend modes.
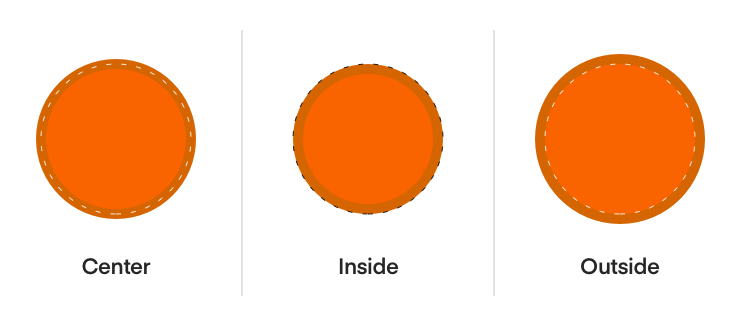
Border Position
The border position can be adjusted on closed shape, by either being placed on the inside, center, or outside of the shape’s outline. If you apply a border onto an open path, then the only available option would be center.
Border Colors

As with the various Fill options, you can also choose to style your borders with a single solid color, or from a variety of gradients.
- Solid Fill
- Linear Gradient
- Radial Gradient
- Angular Gradient
Note: You can quickly toggle the visibility of all borders from a layer by pressing the B key.
Border Options
You can add more customization and options to all the borders in a layer by clicking the settings button ![]() in the Borders title. A popover will display with additional options…
in the Borders title. A popover will display with additional options…

Ends and Joins
Border ends are visible on line layers, and open paths. Here you have the ability to select whether a line should have a butt cap, round cap, or a projecting cap.
 Butt cap: This is the default option that’ll draw the border right to the vector point.
 Round cap: Creates a rounded, semi-circular end to a path that extends past the vector point.
 Projecting cap: Similar to the rounded cap, but with a straight edges.
Joins will be visible on both open and closed paths that have three or more points (to create a corner). They will alter how the corners of a shape should render.
 Miter join: This will simply create an angled, or pointy join. The default setting.
 Round join: Creates a rounded corner for the border. The radius is relative to the border thickness.
 Bevel join: This will create a chamfered edge on the border corner.
Arrowheads
In addition to choosing the border ends for line layers, you can also select arrowheads for the start, or the end of the path. You can switch the order in which the appear by choosing Layer › Path › Reverse Order in the menu.
Dashed Lines
At the bottom of the border options popover, there are four text fields for configuring dashed lines.
For example, a dash pattern of 4-2 will draw the stroke for four pixels, put a two pixel gap, draw four more pixels and then so on. A dashed pattern of 5-4-3-2 will draw a stroke of 5 px, a gap of 4 px, then a stroke of 3 px, a gap of 2 px, and then repeat.
